0%

添加参数

1
2
3
4
5
6
7
8
9
server {
listen 8888;
server_name localhost;

location /{
set $args ${args}&timestamp=$msec;
proxy_pass http://www.baidu.com/;
}
}

背景

我们想要从Nginx接受请求开始,生成一个Unique Tracing ID,不仅记录在Nginx的日志中,也要贯穿到整个后台的服务,从而利用这个ID方便问题的排查。

方案一

利用Nginx丰富的内置变量,拼接出一个“unique enough id”。这里使用了五个变量:

  • $pid: Nginx worker process id
  • $msec: timestamp in millisecond
  • $remote_addr: client address
  • $connection: TCP connection serial number
  • $connection_requests: current number of requests made through a connection

实现步骤

1.在nginx.conf的location模块里:

1
2
3
4
5
location / {
proxy_pass http://upstream;
set $req_id $pid.$msec.$remote_addr.$connection.$connection_requests;
proxy_set_header X-Request-Id $req_id;
}

2.在http模块的 log_format 里加上 $req_id,至此Nginx的日志中将包含这个ID

1
log_format trace '... $req_id';

3.在后台服务中可以通过下面的方式获取$req_id

1
2
3
class MainHandler(tornado.web.RequestHandler):
def get(self):
self.write(self.request.headers["X-Request-Id"])

4.重启Nginx

1
nginx -s reload

问题

格式混乱,信息冗余,生成的效果如下:

1
97372.1493211301.686.127.0.0.1.471.32

方案二

使用Nginx内置的变量 $request_id
这是最直接的办法,使用Nginx自带的一个$request_id,一个16位比特的随机数,用32位的16进制数表示。

1
proxy_set_header X-Request-Id $request_id;

问题

这Nginx 1.11.0 版本新增加的feature,使用Nginx旧版本,或者依赖某些二次开发的Nginx版本,例如 Tengine 继承的是Nginx 1.8.1 版本,都面临着升级Nginx的问题。

方案三

使用 Lua 生成一个uuid.
利用Lua轻量小巧的特性,嵌入到Nginx的配置文件当中,然后生成一个uuid.

实现步骤

1.在 http 模块里加入:

1
2
3
4
5
6
7
8
map $host $uuid {
default '';
}
lua_package_path '/path/to/uuid4.lua';
init_by_lua '
uuid4 = require "uuid4"
math = require "math"
';

2.在server模块里加入:

1
2
3
set_by_lua $uuid '
return uuid4.getUUID()
';

3.在location模块里加入:

1
proxy_set_header X-Request-Id $uuid;

4.uuid4.lua
引用自 第三方库

1
2
3
4
5
6
7
8
9
10
11
12
13
14
15
16
17
18
19
20
21
22
23
24
25
26
27
28
29
30
31
32
33
34
35
36
37
38
39
40
41
42
43
44
45
46
47
48
49
50
51
52
53
54
55
56
57
58
59
60
61
62
63
64
65
66
67
68
69
70
71
72
73
74
75
76
77
78
79
80
81
82
83
84
85
86
87
88
89
90
91
92
93
94
95
96
97
98
99
100
101
102
103
104
--[[
The MIT License (MIT)
Copyright (c) 2012 Toby Jennings
Permission is hereby granted, free of charge, to any person obtaining a copy of this software and
associated documentation files (the "Software"), to deal in the Software without restriction,
including without limitation the rights to use, copy, modify, merge, publish, distribute,
sublicense, and/or sell copies of the Software, and to permit persons to whom the Software is
furnished to do so, subject to the following conditions:
The above copyright notice and this permission notice shall be included in all copies or substantial
portions of the Software.
THE SOFTWARE IS PROVIDED "AS IS", WITHOUT WARRANTY OF ANY KIND, EXPRESS OR IMPLIED, INCLUDING BUT
NOT LIMITED TO THE WARRANTIES OF MERCHANTABILITY, FITNESS FOR A PARTICULAR PURPOSE AND
NONINFRINGEMENT. IN NO EVENT SHALL THE AUTHORS OR COPYRIGHT HOLDERS BE LIABLE FOR ANY CLAIM,
DAMAGES OR OTHER LIABILITY, WHETHER IN AN ACTION OF CONTRACT, TORT OR OTHERWISE, ARISING FROM,
OUT OF OR IN CONNECTION WITH THE SOFTWARE OR THE USE OR OTHER DEALINGS IN THE SOFTWARE.
--]]

local M = {}
-----
math.randomseed( os.time() )
math.random()
-----
local function num2bs(num)
local _mod = math.fmod or math.mod
local _floor = math.floor
--
local result = ""
if(num == 0) then return "0" end
while(num > 0) do
result = _mod(num,2) .. result
num = _floor(num*0.5)
end
return result
end
--
local function bs2num(num)
local _sub = string.sub
local index, result = 0, 0
if(num == "0") then return 0; end
for p=#num,1,-1 do
local this_val = _sub( num, p,p )
if this_val == "1" then
result = result + ( 2^index )
end
index=index+1
end
return result
end
--
local function padbits(num,bits)
if #num == bits then return num end
if #num > bits then print("too many bits") end
local pad = bits - #num
for i=1,pad do
num = "0" .. num
end
return num
end
--
local function getUUID()
local _rnd = math.random
local _fmt = string.format
--
_rnd()
--
local time_low_a = _rnd(0, 65535)
local time_low_b = _rnd(0, 65535)
--
local time_mid = _rnd(0, 65535)
--
local time_hi = _rnd(0, 4095 )
time_hi = padbits( num2bs(time_hi), 12 )
local time_hi_and_version = bs2num( "0100" .. time_hi )
--
local clock_seq_hi_res = _rnd(0,63)
clock_seq_hi_res = padbits( num2bs(clock_seq_hi_res), 6 )
clock_seq_hi_res = "10" .. clock_seq_hi_res
--
local clock_seq_low = _rnd(0,255)
clock_seq_low = padbits( num2bs(clock_seq_low), 8 )
--
local clock_seq = bs2num(clock_seq_hi_res .. clock_seq_low)
--
local node = {}
for i=1,6 do
node[i] = _rnd(0,255)
end
--
local guid = ""
guid = guid .. padbits(_fmt("%X",time_low_a), 4)
guid = guid .. padbits(_fmt("%X",time_low_b), 4)
guid = guid .. padbits(_fmt("%X",time_mid), 4)
guid = guid .. padbits(_fmt("%X",time_hi_and_version), 4)
guid = guid .. padbits(_fmt("%X",clock_seq), 4)
--
for i=1,6 do
guid = guid .. padbits(_fmt("%X",node[i]), 2)
end
--
return guid
end
--
M.getUUID = getUUID
return M

问题

Lua的这个模块太长,担心性能问题,需要进行性能评估。

方案四

还是利用Lua脚本,使用时间戳加随机数的方式
关键步骤:

1
2
3
set_by_lua $rdm_number '
return os.time() .. os.clock()*100 .. math.random(1000000000, os.time())
';

问题

os.time()的精确度在1秒,os.clock()的精确度在0.01秒,这样处理之后,总的精度在10毫秒,没有达到要求。
Lua有一个 Luasocket 模块,可以达到毫秒级别的精度,但是需要安装。

方案五

结合Nginx的 $msec 变量和 Lua 的随机数
关键配置

1
2
3
4
5
6
7
8
9
10
11
server {
...
set_by_lua $rdm_number '
return math.random(1000000000, os.time())
';
location / {
...
set $req_id $msec$rdm_number;
proxy_set_header X-Request-Id $req_id;
}
}

终记

最终确定方案五,简单,方便,影响最小。
在方案选择、测试过程中,还遇到了环境搭建相关的问题,将记录在下篇文章中,敬请期待!


参考

1.http://stackoverflow.com/questions/17748735/setting-a-trace-id-in-nginx-load-balancer
2.https://blog.ryandlane.com/2014/12/11/using-lua-in-nginx-for-unique-request-ids-and-millisecond-times-in-logs/
3.http://www.jb51.net/article/82167.htm
4.http://nginx.org/en/docs/http/ngx_http_core_module.html#.24args
5.http://nginx.org/en/docs/http/ngx_http_core_module.html#var_request_id

目录

  • 1.解决方案
  • 2.原始文件和最终生成效果
  • 3.pom.xml 中插件添加
  • 4.html中 css/js 文件引用规则

1.解决方案

1
2
3
4
5
6
7
解决问题:
防止浏览器缓存,修改静态文件(js/css)后无效,需要强刷。

解决方案:
使用 maven 的 com.google.code.maven-replacer-plugin 插件,
在项目打包 package 时自动为静态文件追加 xxx.js?v=time 的后缀,
从而解决浏览器修改后浏览器缓存问题,此插件只会在生成 war 包源码时生效,不需要修改任何代码。

2.原始文件和最终生成效果

1
2
3
4
5
原始文件:
<script src="${resource!}/js/xxx/xxx.js"></script>

打包后:
<script src="${resource!}/js/xxx/xxx.js?v=20180316082543"></script>

3.pom.xml 中插件添加

1
2
3
4
5
6
7
8
9
10
11
12
13
14
15
16
17
18
19
20
21
22
23
24
25
26
27
28
29
30
31
32
33
34
35
36
37
38
39
40
41
42
43
44
45
46
47
48
49
50
51
52
53
54
55
56
57
58
59
60
61
62
63
64
65
66
67
<properties>
<!-- maven.build.timestamp 默认时间戳格式 -->
<maven.build.timestamp.format>yyyyMMddHHmmss</maven.build.timestamp.format>
</properties>

<plugins>
<plugin>
<groupId>org.apache.maven.plugins</groupId>
<artifactId>maven-war-plugin</artifactId>
<configuration>
<!-- 使用缓存 -->
<useCache>true</useCache>
</configuration>
<executions>
<!-- 在打包之前执行,打包后包含已经执行后的文件 -->
<execution>
<id>prepare-war</id>
<phase>prepare-package</phase>
<goals>
<goal>exploded</goal>
</goals>
</execution>
</executions>
</plugin>
<plugin>
<groupId>com.google.code.maven-replacer-plugin</groupId>
<artifactId>replacer</artifactId>
<version>1.5.3</version>
<executions>
<!-- 打包前进行替换 -->
<execution>
<phase>prepare-package</phase>
<goals>
<goal>replace</goal>
</goals>
</execution>
</executions>
<configuration>
<!-- 自动识别到项目target文件夹 -->
<basedir>${build.directory}</basedir>
<!-- 替换的文件所在目录规则 -->
<includes>
<include>${build.finalName}/WEB-INF/views/*.html</include>
<include>${build.finalName}/WEB-INF/views/**/*.html</include>
</includes>
<replacements>
<!-- 更改规则,在css/js文件末尾追加?v=时间戳,反斜杠表示字符转义 -->
<replacement>
<token>\.css\"</token>
<value>.css?v=${maven.build.timestamp}\"</value>
</replacement>
<replacement>
<token>\.css\'</token>
<value>.css?v=${maven.build.timestamp}\'</value>
</replacement>
<replacement>
<token>\.js\"</token>
<value>.js?v=${maven.build.timestamp}\"</value>
</replacement>
<replacement>
<token>\.js\'</token>
<value>.js?v=${maven.build.timestamp}\'</value>
</replacement>
</replacements>
</configuration>
</plugin>
</plugins>

4.html中 css/js 文件引用规则

文件引用结尾处,必须是pom.xml文件中添加的规则:

1
2
3
<script src="${resource!}/js/xxx/xxx.js" type="text/javascript"></script>

<link href="${resource!}/css/xxx/xxx.css" rel="stylesheet" type="text/css">

  1. 点击菜单栏左下角“开始”按钮,在右侧的菜单栏中点击“管理工具”选项,在弹出的右侧菜单栏中点击“事件查看器”选项。
image-20210514132656150
  1. 弹出的“事件查看器”界面右侧,左侧有“windows日志”选项,单击左侧“+”。

    image-20210514132203607
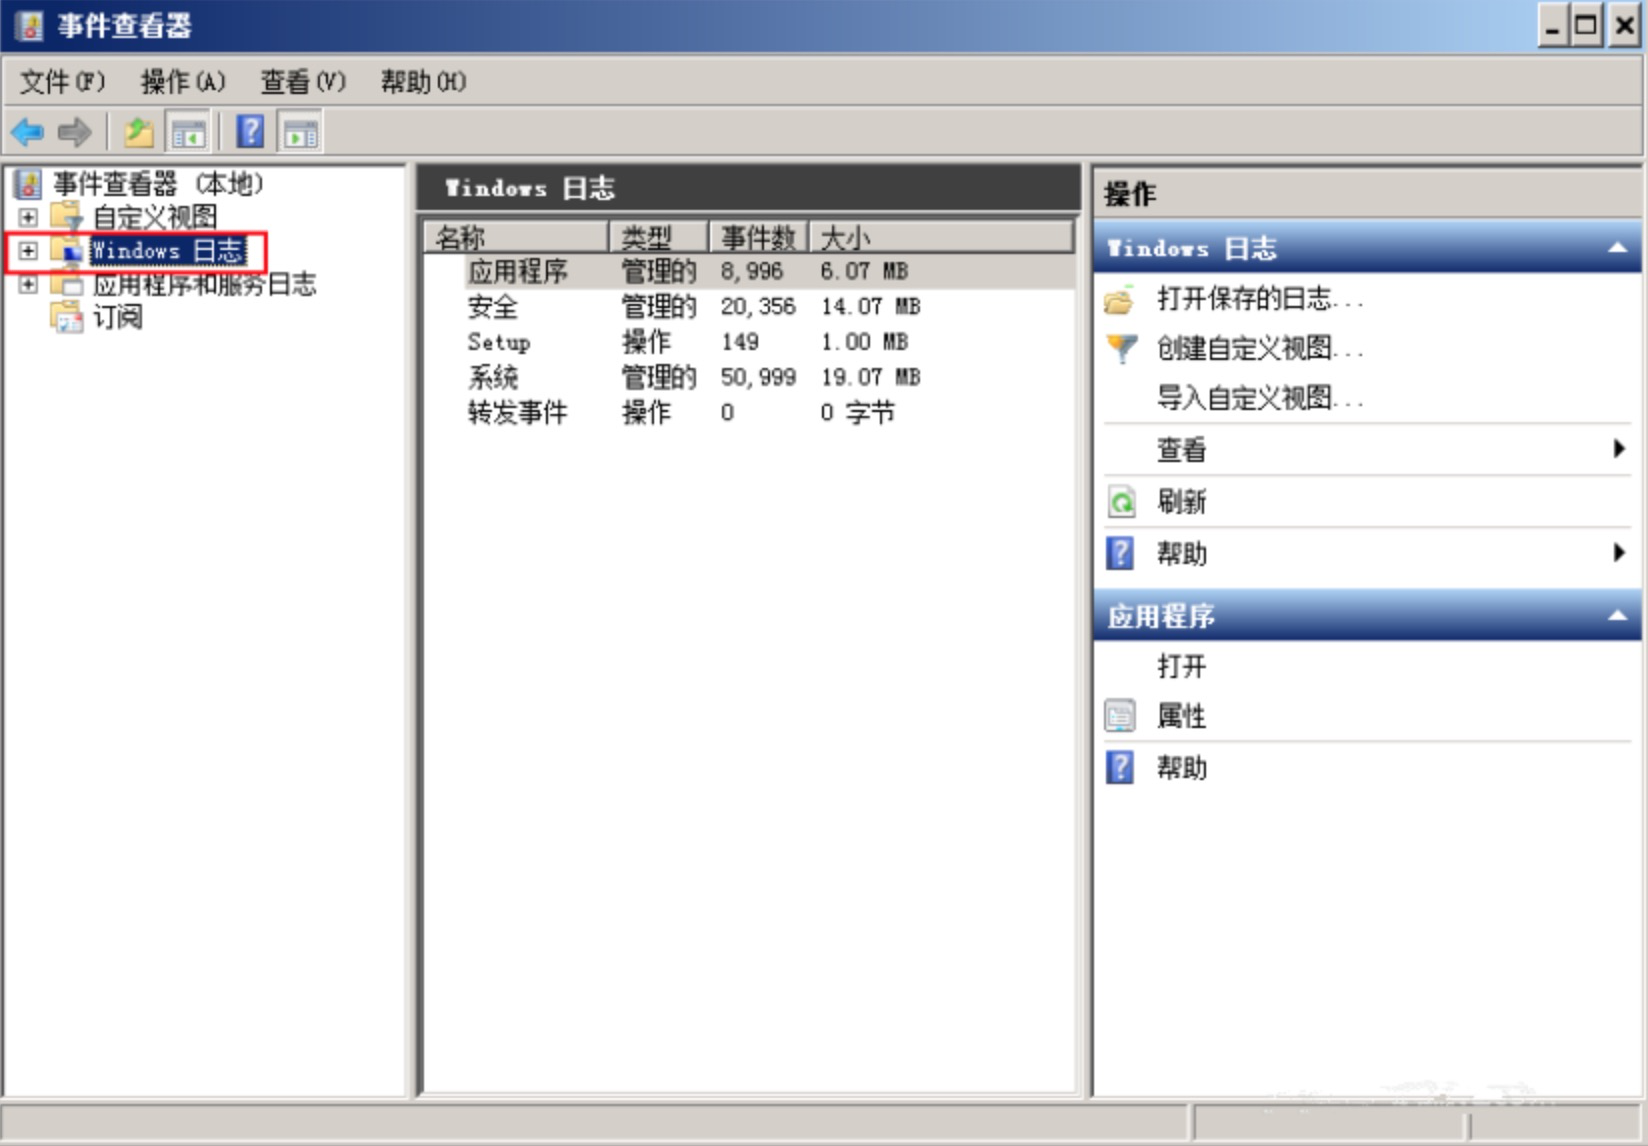
  2. 在展开的列表中选中“系统”这一选项可以看到系统产生的日志记录。

    image-20210514132225205
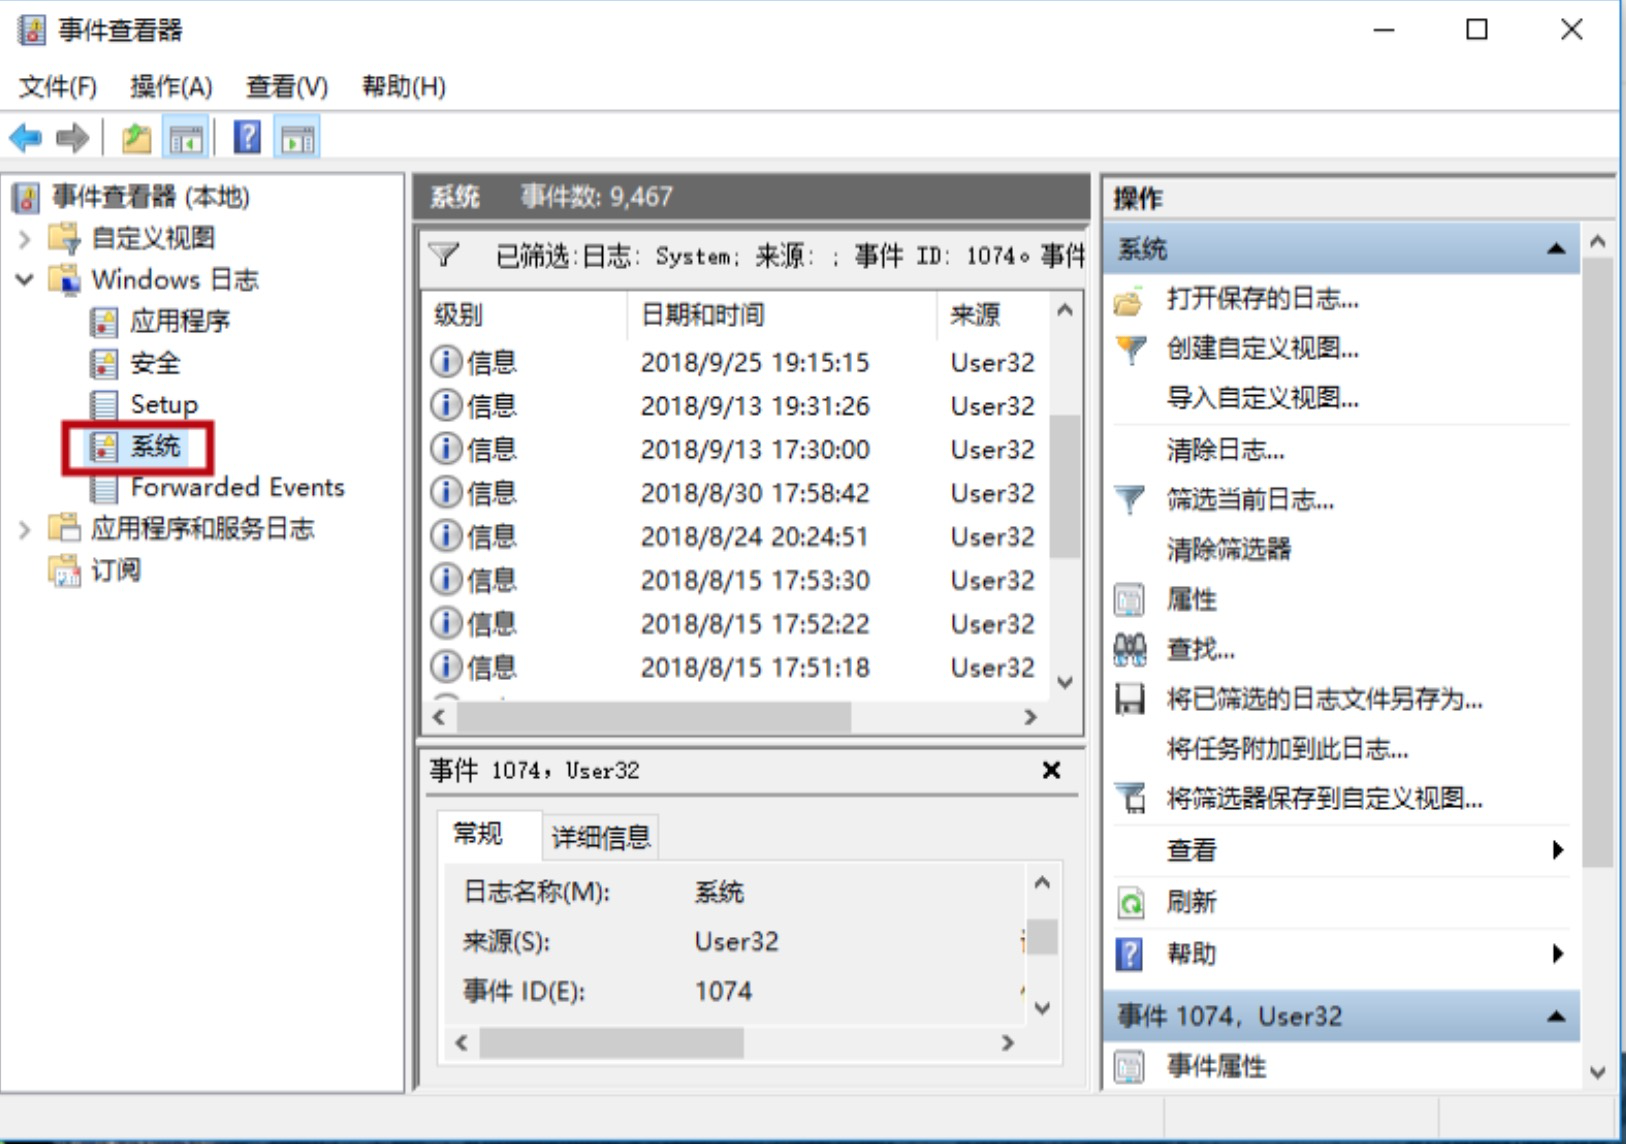
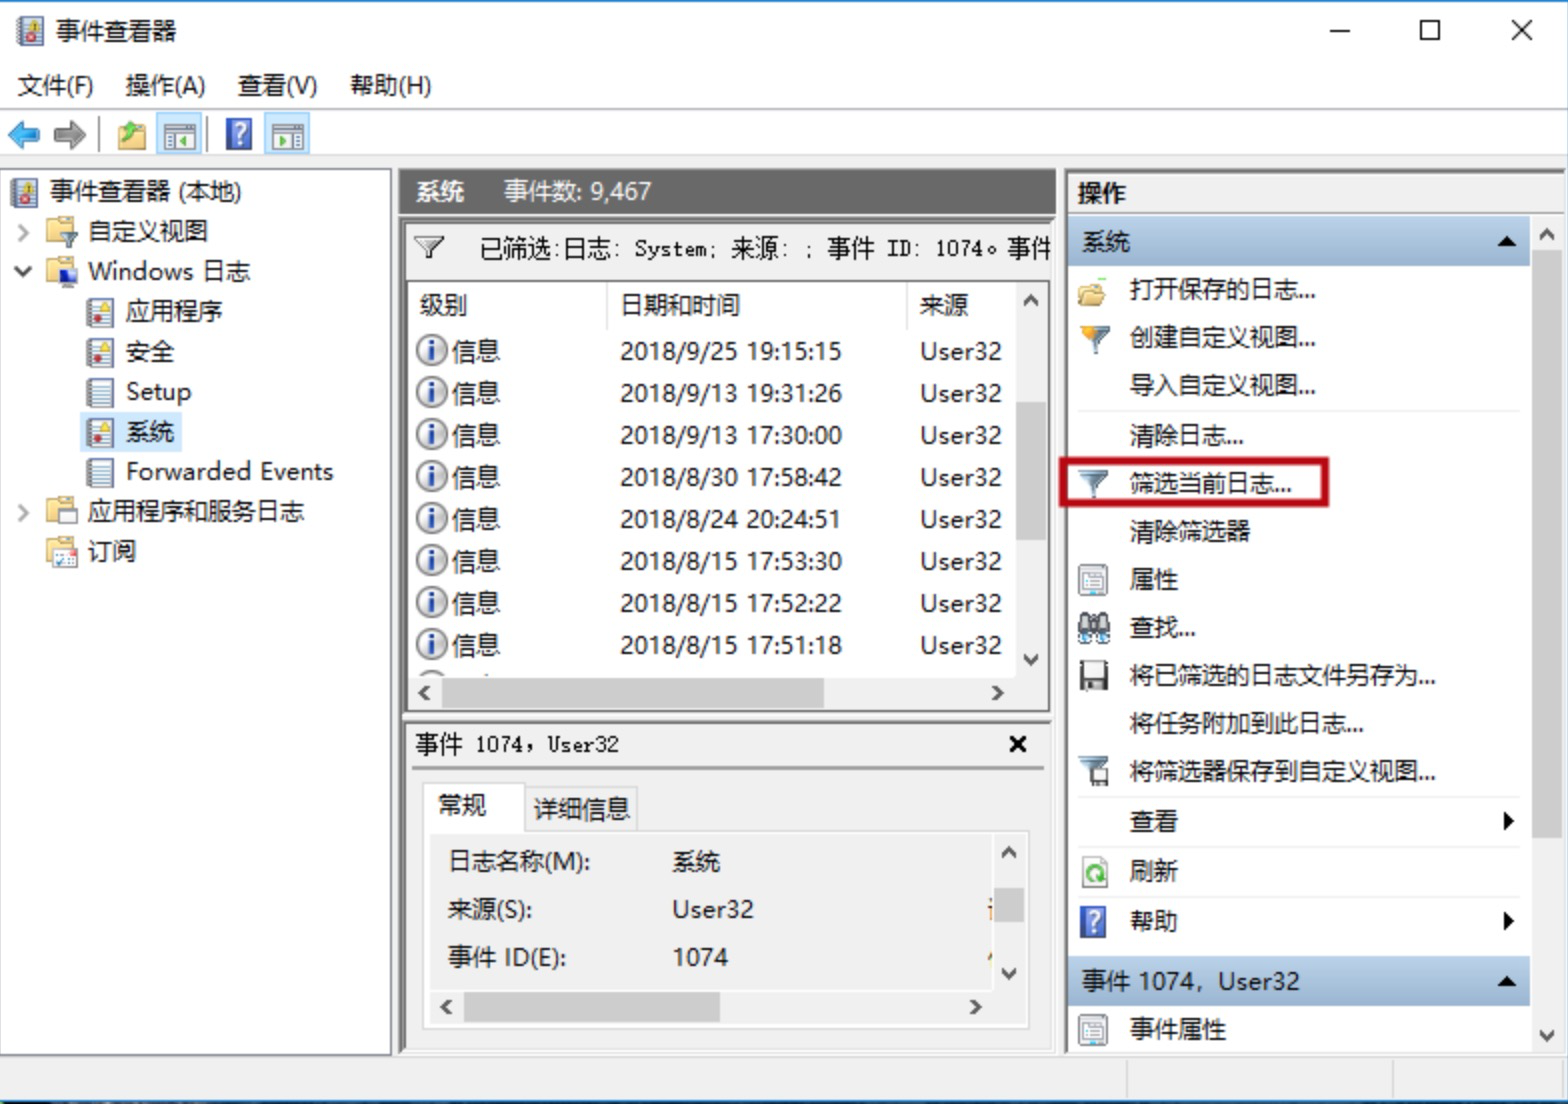
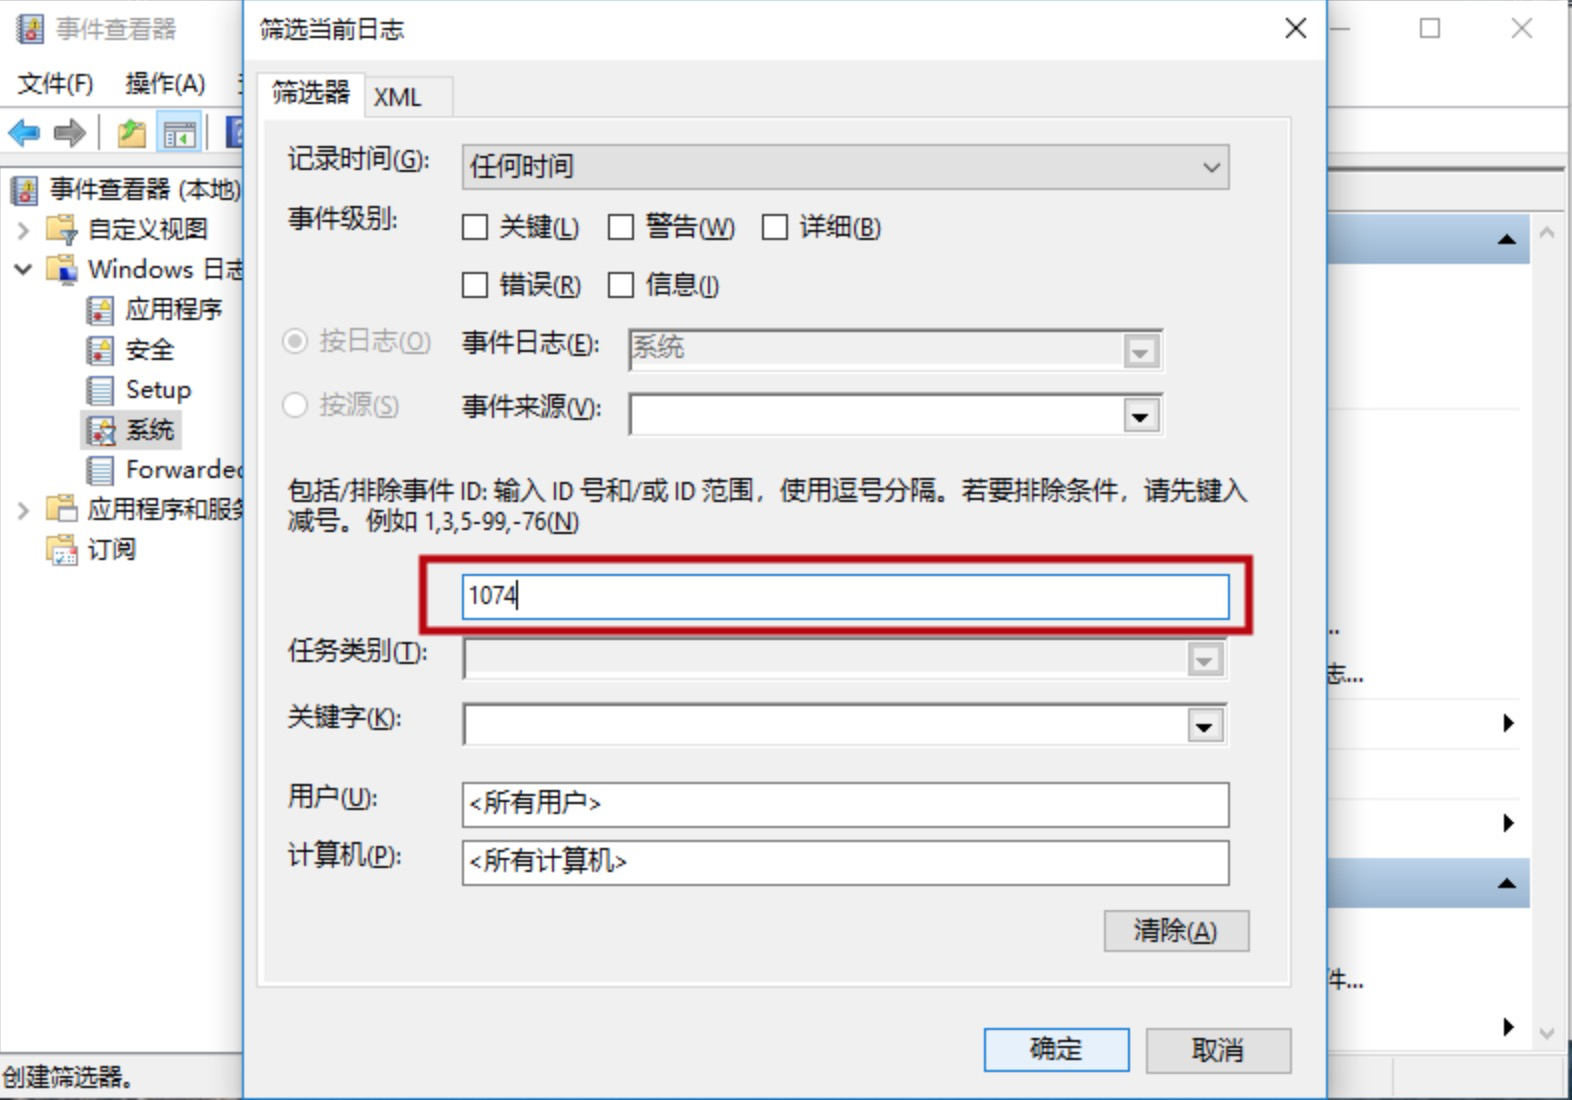
  3. 为了方便直接查找重启的日志,在右侧的菜单栏中点击“筛选当前日志…”。

    image-20210514132241330
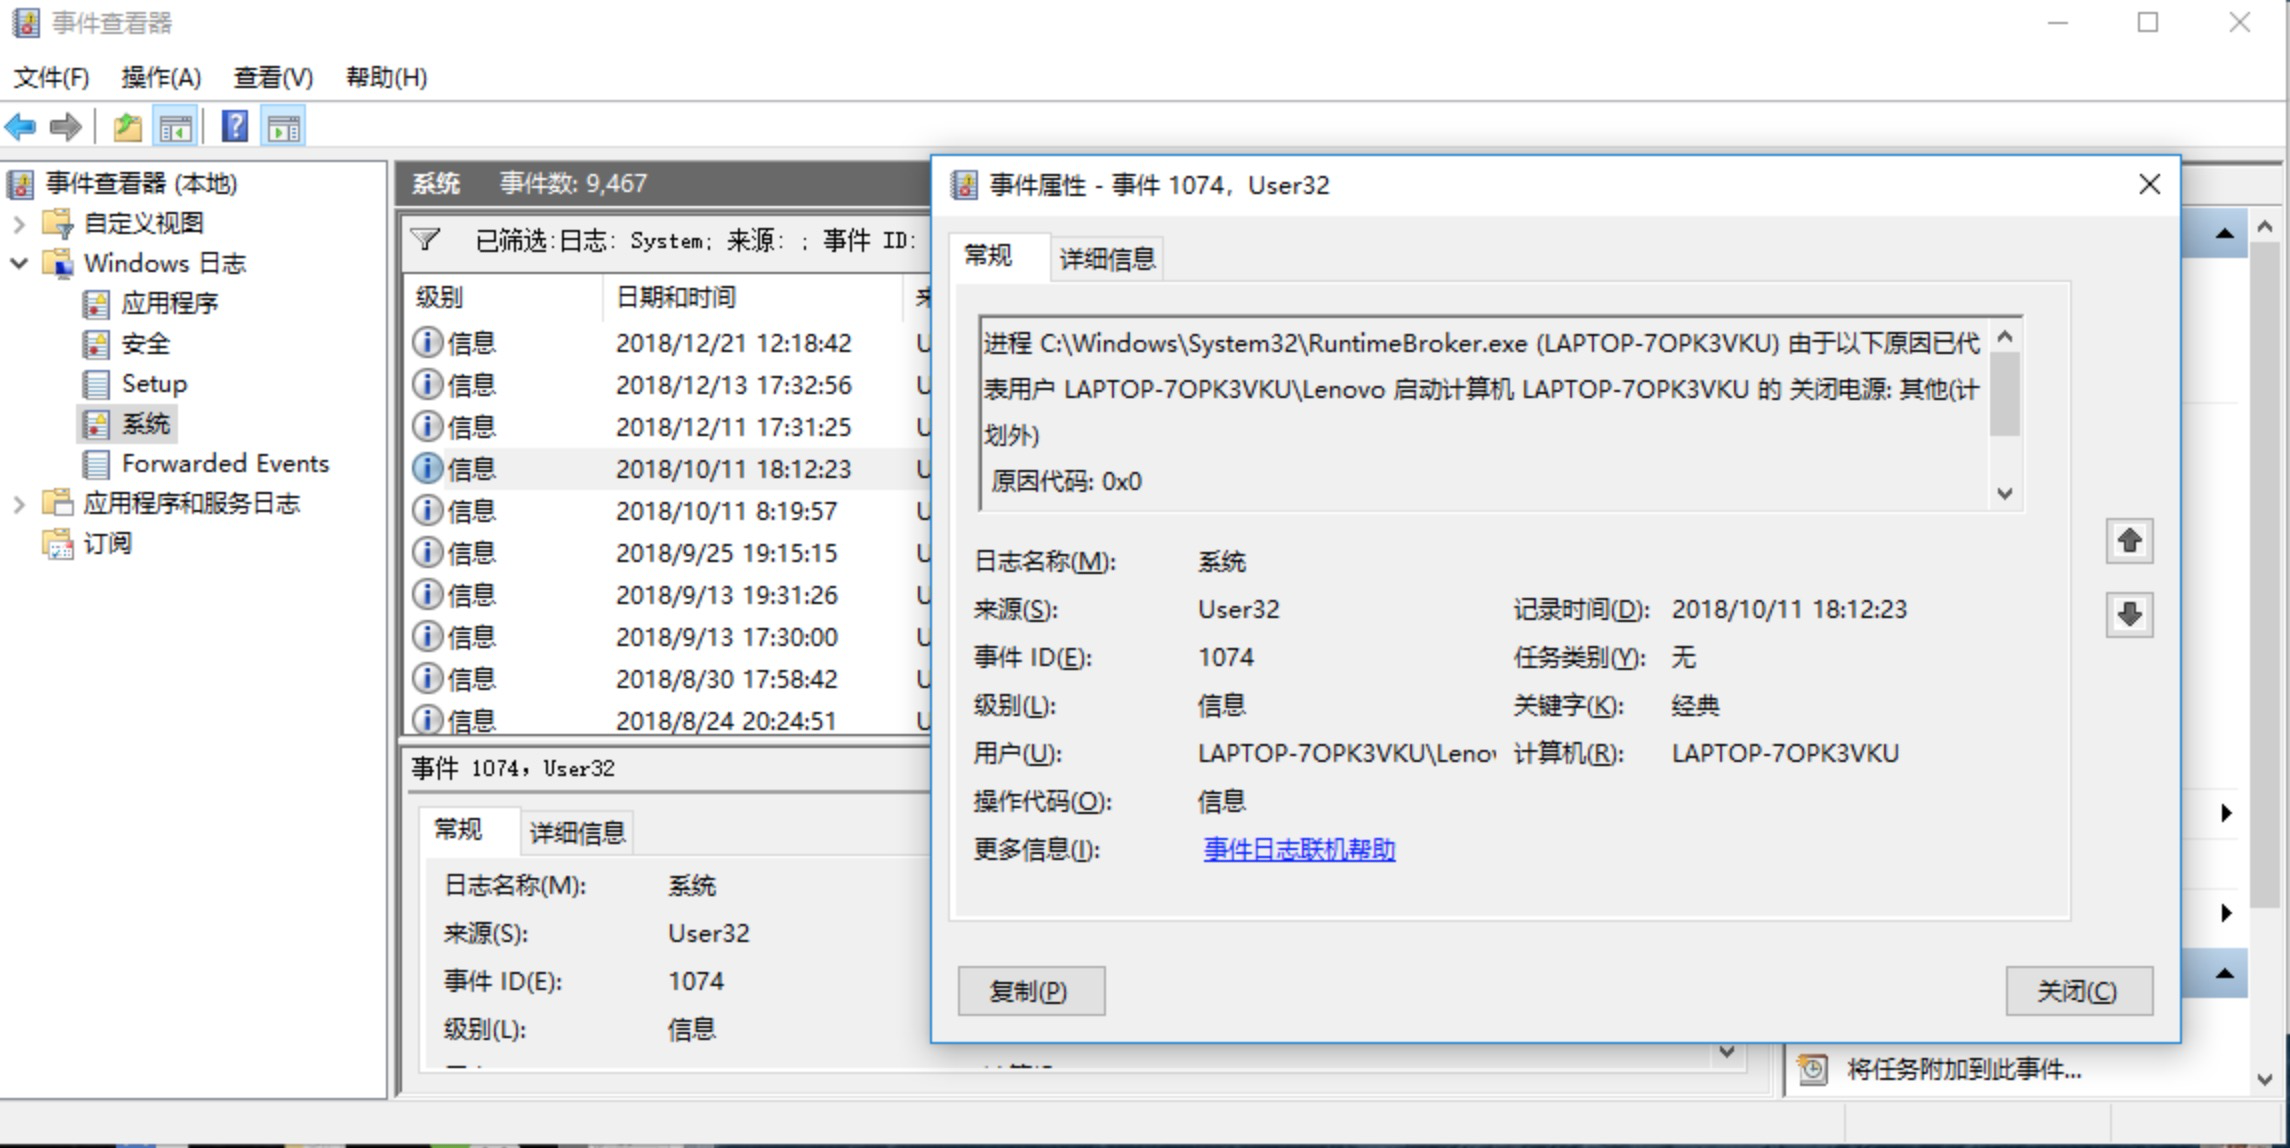
  4. 在弹出的窗口中选择“筛选器”选项卡,并在“任务类别”这一选项框上方的框中输入“1074”的事件ID,接着点击下方的“确定”即可看到系统所有的重启日志记录。(注:“1074”为系统重启的事件ID)

    image-20210514132301214 image-20210514132317909
  5. 若要查看详细信息,双击该条目即可。

    image-20210514132335162

服务器

工具类

软件 地址 账号
FTP 101.68.85.251:18027(公网)
ftp.jhkj.com:18027(内网)
jh_ftp_read / YTkzODI2YmUyZDI(只读)
jh_ftp_write / NzU1OWJlM2VkMmJ(读写)